Delta ShopMaster SM500 User Manual Page 12
- Page / 68
- Table of contents
- BOOKMARKS
- (Model SM500) 1
- TABLE OF CONTENTS 2
- IMPORTANT SAFETY INSTRUCTIONS 2
- CALIFORNIA PROPOSITION 65 3
- GENERAL SAFETY RULES 4
- SAVE THESE INSTRUCTIONS 5
- Refer to them often 5
- POWER CONNECTIONS 6
- GROUNDING INSTRUCTIONS 6
- FUNCTIONAL DESCRIPTION 7
- C A RTON CONTENTS 8
- A S S E M B LY 9
- ADJUSTING THE BELT TENSION 9
- ATTACHING THE SANDING DISC 11
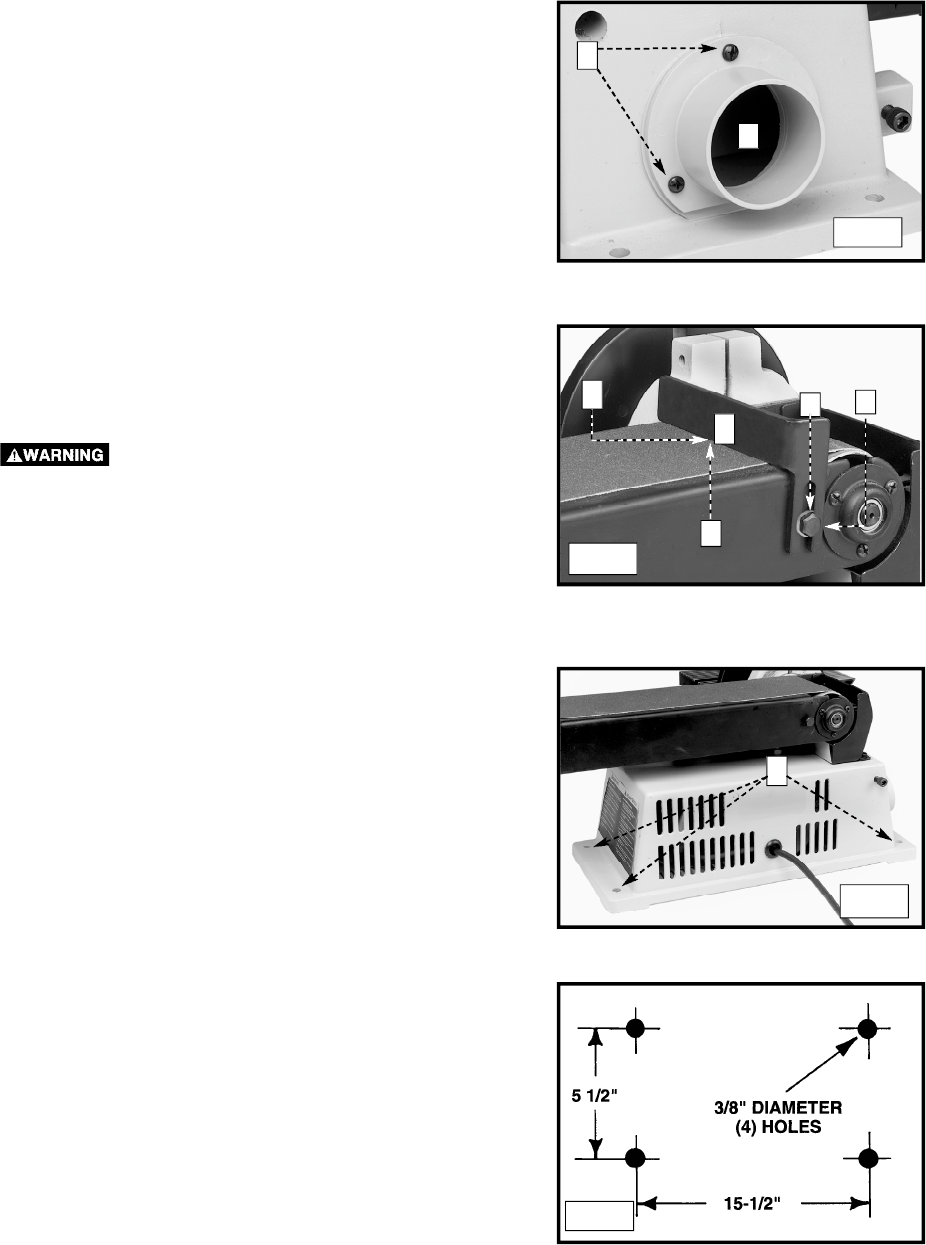
- ATTACHING THE DUST CHUTE 12
- O P E R AT I O N 13
- TRACKING THE SANDING BELT 14
- TILTING THE TABLE 15
- MITER GAUGE 16
- WRENCH STORAGE 17
- REPLACING THE SANDING DISC 18
- REPLACING THE SANDING BELT 18
- M A C H I N E U S E 19
- T R O U B L E S H O O T I N G 20
- M A I N T E N A N C E 21
- ACCESSORIES 21
- S E R V I C E 21
- WARRANTY 22
- Lijadora de Correa de 4" 23
- / Disco de 6 23
- GUARDE ESTAS INSTRUCCIONES! 24
- SEGURIDAD PERSONAL 25
- SEGURIDAD AMBIENTAL 25
- LIMPIEZA Y ELIMINACIÓN 25
- PROPOSICIÓN DE CALIFORNIA 65 25
- NORMAS GENERALES DE SEGURIDAD 26
- GUARDE ESTAS INSTRUCCIONES 27
- Consúltelas a menudo 27
- DESCRIPCIÓN FUNCIONAL 29
- CONTENIDO DE CART O N 30
- E N S A M B L A J E 31
- O P E R A C I Ó N 35
- INCLINACION DE LA MESA 37
- LELA AL DISCO DE LIJADO 38
- ESCUADRA DE INGLETES 38
- ALMACENAMIENTO DE LLAVES 39
- REEMPLAZO DEL DISCO DE LIJADO 40
- UTILIZAR LA MAQUINA 41
- LOCALIZACION DE FA L L A S 42
- S E RV I C I O 43
- A C C E S O R I O S 43
- MANTENIMIENTO 43
- G A R A N T I A 44
- Ponceuse à courroie de 45
- 102 mm (4 po) - à disque de 45
- 152 mm (6 po) 45
- (modèle SM500) 45
- DÉFINITIONS 47
- RÈGLES GÉNÉRALES DE SÉCURITÉ 48
- CONSERVER CES DIRECTIVES 49
- CONNEXIONS ÉLECTRIQUES 50
- DIRECTIVES DE MISE À LA TERRE 50
- DESCRIPTION FONCTIONNELLE 51
- CONTENU DU CART O N 52
- A S S E M B L A G E 53
- DE LA POULIE 54
- 3/8 po (9,5 mm) 56
- (4 trous) 56
- F O N C T I O N N E M E N T 57
- ABRASIVE 59
- INCLINAISON DE LA TABLE 59
- JAUGE À ONGLET 60
- LA PONCEUSE 61
- D É PA N N A G E 64
- LA GARANTIE 65
- GARANTIE 66
- · DELTA SERVICE CENTERS 67
© 2020, manymanuals.com. All rights reserved. | 1.180 s |
 Manymanuals.com
 Manymanuals.de
 Manymanuals.fr
 Manymanuals.it
 Manymanuals.pl
 Manymanuals.cz
 Manymanuals.es
 Manymanuals-pt.com
Comments to this Manuals